You are reading Part 4 of our Hustly email service guide series. Choose another guide below at any time.
| Guide | Topic |
|---|---|
| Part 1 | How to Enable Your Hustly Email Inbox Service |
| Part 2 | How to Configure DNS Records for Your Hustly Email Inbox Service |
| Part 3 | How to Create and Manage Your Hustly Email Inboxes |
| Part 4 | How to configure Email Clients to access your Hustly Email. (current guide) |
| Part 5 | Advanced Email Options - Login to your Hustly email admin panel. |
| Part 6 | How to set up Email Forwarding with your Hustly Email service. |
| Part 7 | How to view email logs in Hustly email admin panel. |
| Part 8 | How to migrate and import your existing emails into your Hustly email service |
You can access your Hustly inbox using webmail or connect it to an email application such as Outlook, Thunderbird or a mobile email app. You can also use the provided SMTP settings in a compatible mail client or sending application.
Before you start
Make sure you have activated the email service, configured the domain DNS and created an email inbox. Keep the full email address and its password ready.
Find your IMAP, POP3 and SMTP settings
Once you have completed all the steps above, your emails should already be functional from the webmail interface. However, if you wish to use your email service as an SMTP service, or configure Email clients like Outlook, the settings are available in your Hustly account.
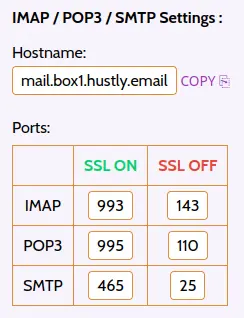
Login to your Hustly account and navigate to the Email section. Scroll all the way down to the IMAP / POP3 / SMTP Settings section:
Add the mailbox to your email client
- Open your email client and choose to add an existing email account.
- Enter your full Hustly email address and mailbox password.
- For incoming mail, enter the IMAP settings displayed in your Hustly account (or POP3 if that is specifically what you prefer).
- For outgoing mail, enter the SMTP server and port shown in your Hustly account.
- Enable SSL/TLS as indicated in your Hustly account and save the account settings.
- Send a test message and check that you can receive a reply.
Please use the ports for SSL turned on to ensure your emails are protected by SSL. Copy the settings above in the interface of your Email client or SMTP client. Your email client will also ask for a username and password, which will be your email address and password for the email used for sending or receiving emails.
Choosing IMAP or POP3
IMAP is generally the more convenient choice when you access the same inbox on multiple devices, because it keeps messages synchronized with the server. POP3 may be suitable for a specific download-based workflow. Use the settings displayed in your Hustly account rather than guessing server hostnames or ports.
If email is not working
Double-check the mailbox password, server names, SSL/TLS selections and DNS records. If messages send but do not arrive, or arrive but do not send, see the email logs guide.
Continue with the next guide
Previous: How to Create and Manage Your Hustly Email Inboxes
Next: Advanced Email Options – Login to your Hustly email admin panel.
Moving existing mailboxes? Read our email migration guide.
We hope you found this guide useful. If you need assistance setting up your Hustly email service, please create a support ticket in your Hustly account.