The Hustly email service allows you to create email accounts and addresses, activate the email service on your domains and use the email service as an SMTP service or for forwarding. This a step-by-step guide that will assist you through the process of activating the email service on a domain and configuring the domain’s DNS records.
If you are a Hustly customer and need assistance in making these changes, please create a support ticket to have your domains setup by us at no extra cost.
Before you read this article, we assume that you have read and completed setting up the following:
- Creating and setting up your Hustly hosting account
- How to login to your hosting server’s admin panel
You must add at least one domain to your Hustly hosting account, before you can activate the email service.
Step 1: Activate the Email service
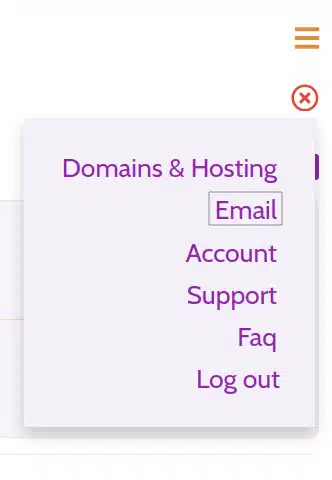
To activate the new email service, please click on the top right hamburger menu in your Husty account and navigate to the “Email” section.
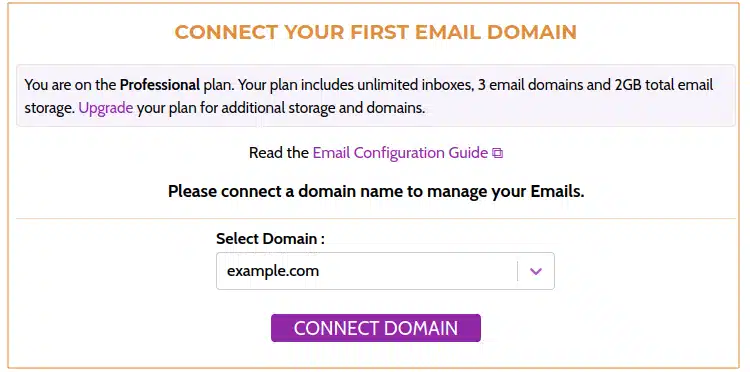
You will be prompted to set up your mail account. Please select one of your domain names as the primary domain name associated with your mail account. You can add additional domains later.
Once the domain is connected, you will be able to create your administration credentials to login to your Email Administration Panel. Your account will now also show other configuration details related to your email service.
Step 2: Access the Email Admin Panel
The Email Administration Panel allows you to create and manage your email accounts and email domains. To access the Email Admin Panel, you will first need to generate your login credentials.
Please navigate to the “EMAIL ADMIN PANEL URL” section, and click on “Reset Password”.
Please save the generated password and set this as your password by checking the confirmation box and clicking “Set New Password”. Please note that you can reset this password as many times as you like.
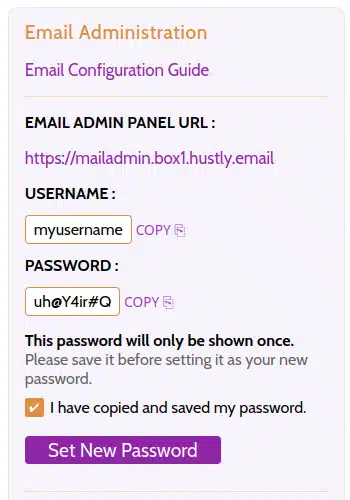
With these credentials (username and password), you will be able to login to your Email Admin Panel.
Step 3: Create Email Accounts
Visit the Email Admin Panel URL, and login to your Email Administration Panel with the credentials generated in Step 2, and the Email Admin Panel URL.
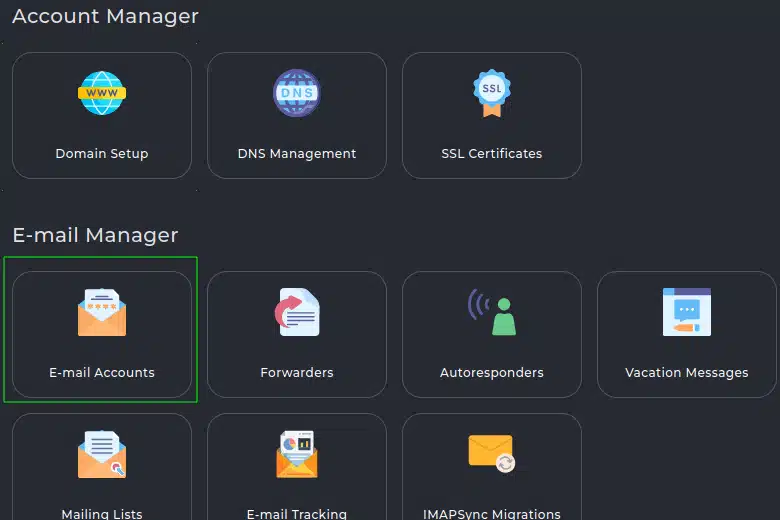
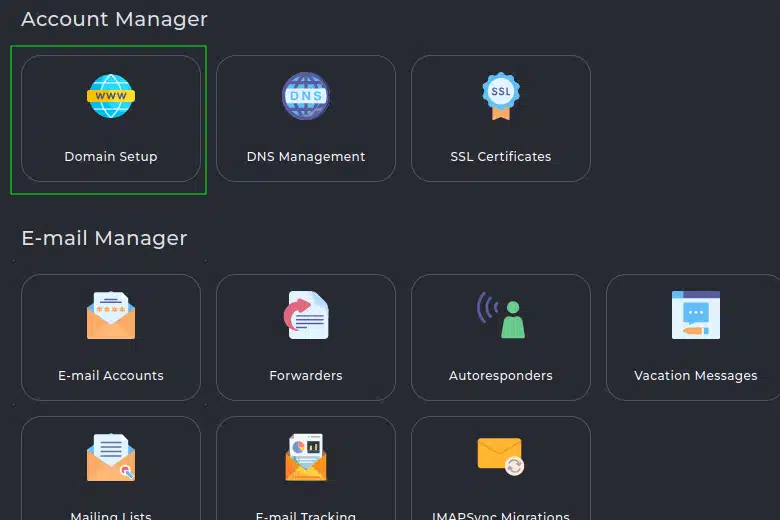
To create Email accounts, navigate to the E-mail Accounts section. This option is available in the E-mail manager section either on the home screen or on the navigation menu on the left.
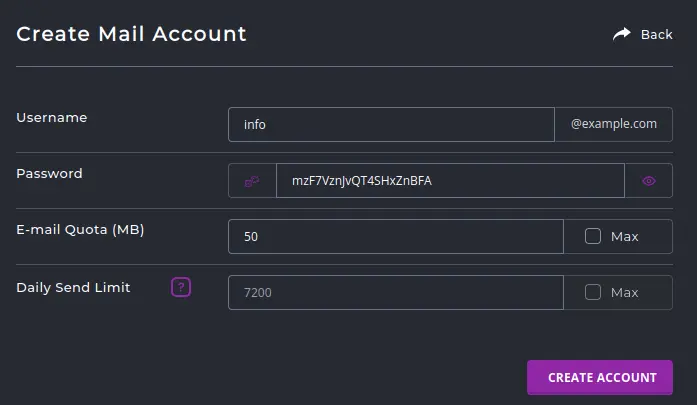
Once you are in the E-mail Accounts section, you can add new Email inboxes simply by clicking the “Create Account” button on the top right menu.![]()
You will be prompted to enter your email address, set a password and set the storage quota for the inbox. Please save the password you generate here. In case you forget this password, the email admin panel will also let you reset your email account passwords as many times as you like.
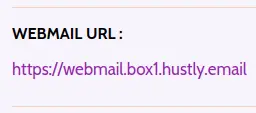
Once you have created your email accounts, you can login to the Webmail URL shown in the Email section of your Hustly account with the credentials you generated here. Simply go back to the Email section of your Hustly account, and scroll down to the “Webmail URL” section. This is the URL you will visit to access your email using webmail.
Adding additional email domains
You can add additional Email domains from the Domain Setup section. The number of domain names you can add, depends on your hosting plan.
When an additional domain is added, you will be prompted to verify ownership, by adding the displayed DNS TXT record.
Step 4: Add DNS records for your email service
Once you have created your email accounts, you will want to configure your DNS records. Please note that without creating these records, you will be NOT be able to send or receive emails reliably.
You need to add the following DNS records:
For receiving emails:
In case you want to use your Hustly email service to receive emails, you will need to add a pair of MX records.
If you wish to use a different email service (such as Google), please use the MX records provided by your email service provider. Please note that you can only use 1 service to receive emails. However, you can setup email forwarding between different email services and Hustly. Therefore, you should only have MX records for any one email service provider.
MX Records:
You will need to add 2 MX records. To find these records, please go back to the Email section of your Hustly account and scroll to the DNS (MX) Records section.
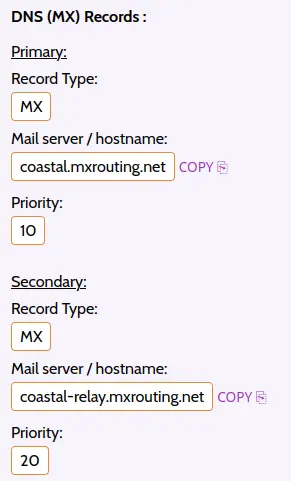
Please add the 2 records in your Domain’s DNS settings. Once you update these DNS settings please wait at least 20-30 minutes for DNS changes to propagate. Once the DNS settings are update, you should be able to receive emails in your new inbox.
Please ensure that these are the only MX records for your domain. Note: these records are to be added to the root (@) of the domain you are using to send emails.
For sending emails:
These records ensure that your emails are sent reliably and not blocked or marked as spam by the receiving email service. Please note that email deliver-ability is a vast topic, so we are only covering the most important configurations that you must have.
There are 3 most important records that are to be added to ensure smooth deliver-ability of emails – an SPF record, a DMARC record and a DKIM record.
SPF Record:
Record Type: TXT
Value: “v=spf1 include:mxroute.com ~all”
Subdomain/Host: _dmarc
Value: “v=DMARC1; p=none; rua=mailto:[email protected]”
Subdomain/Host: x._domainkey
Record Type: TXT
Value: Your DKIM public record
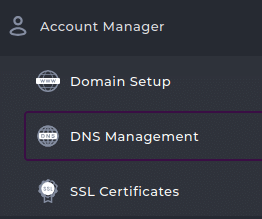
To find your DKIM public record, login to your Email Admin Panel, and navigate to the “DNS Management” in the “Account Manager” section. You can also find this option on the grid menu in your Mail Admin Panel’s home screen.

Step 5: Configuring your mail clients
Once you have completed all the steps above, your emails should already be functional from the webmail interface. However, if you wish to use your email service as an SMTP service, or configure Email clients like Outlook, the settings are available in your Hustly account.
Login to your Hustly account and navigate to the Email section. Scroll all the way down to the IMAP / POP3 / SMTP Settings section:
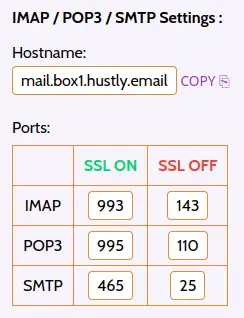
Please use the ports for SSL turned on to ensure your emails are protected by SSL. Copy the settings above in the interface of your Email client or SMTP client. Your email client will also ask for a username and password, which will be your email address and password for the email used for sending or receiving emails.
That’s it!
The entire process should be error free, if you have followed all the steps.
We hope you found this guide useful. If you have any questions, comments or feedback, please feel free to share your thoughts in the comments section below.