You are reading Part 2 of our Hustly email service guide series. Choose another guide below at any time.
| Guide | Topic |
|---|---|
| Part 1 | How to Enable Your Hustly Email Inbox Service |
| Part 2 | How to Configure DNS Records for Your Hustly Email Inbox Service (current guide) |
| Part 3 | How to Create and Manage Your Hustly Email Inboxes |
| Part 4 | How to configure Email Clients to access your Hustly Email. |
| Part 5 | Advanced Email Options – Login to your Hustly email admin panel. |
| Part 6 | How to set up Email Forwarding with your Hustly Email service. |
| Part 7 | How to view email logs in Hustly email admin panel. |
| Part 8 | How to migrate and import your existing emails into your Hustly email service |
This guide explains how to configure the DNS records needed for your Hustly email service after adding your first email domain. If your domain’s DNS is managed by Hustly, these records should already be configured automatically. Otherwise, you will need to add them manually.
Important: Without the correct email DNS records, you will not be able to send or receive messages reliably. Check where your DNS is currently hosted before making changes.
If you are currently using another mail provider, DO NOT PROCEED with the steps in this guide until you have migrated and backed up your existing emails. See our email migration guide.
Before you start
Complete Part 1: Enable your Hustly email inbox service and connect your first domain. If you are moving existing email addresses, review our email migration guide before changing your MX records.
Having trouble with your email DNS settings? Skip To Troubleshooting.
Automatic Configuration (DNS is managed by Hustly)
If your domain uses Hustly’s hosting server as its primary nameserver, the required email DNS records will be added automatically when you activate your Hustly email service and connect your domain.
This means you should not need to manually configure your domain’s MX, SPF, DMARC or DKIM records.
If you are unsure whether your domain’s DNS is managed by Hustly, please refer to our guide on how to use your Hustly server as your domain’s primary nameserver.
Using Hustly to manage your DNS? If you have already activated your email service, connected your domain and your DNS is managed by Hustly, you can skip the manual configuration instructions below and continue to Part 3: How to Create and Manage Your Hustly Email Inboxes.
Manual Configuration (DNS managed outside Hustly)
If your domain’s DNS is managed by another provider, such as your domain registrar or a third-party DNS service, you will need to add the required email DNS records manually.
You can also use the instructions below to verify that your email DNS records have been correctly configured if you are using Hustly’s nameservers.
DNS Records for receiving emails
In order for your Hustly email service to receive emails, you will need to add a pair of MX records to your domain’s DNS records. If you wish to use a different email service (such as Google), please use the MX records provided by your email service provider. Your domain should normally have MX records for only one incoming email provider, although you can set up forwarding between different services. If you are moving to Hustly, replace your previous provider’s MX records with the two records shown in your Hustly account once you are ready to switch incoming mail.
MX Records
To find your Hustly MX records, navigate to the Email Admin section of your Hustly account and scroll down to DNS (MX) Records. This section displays your two MX records. These values are specific to your account, so copy them directly from your Hustly account rather than this article.
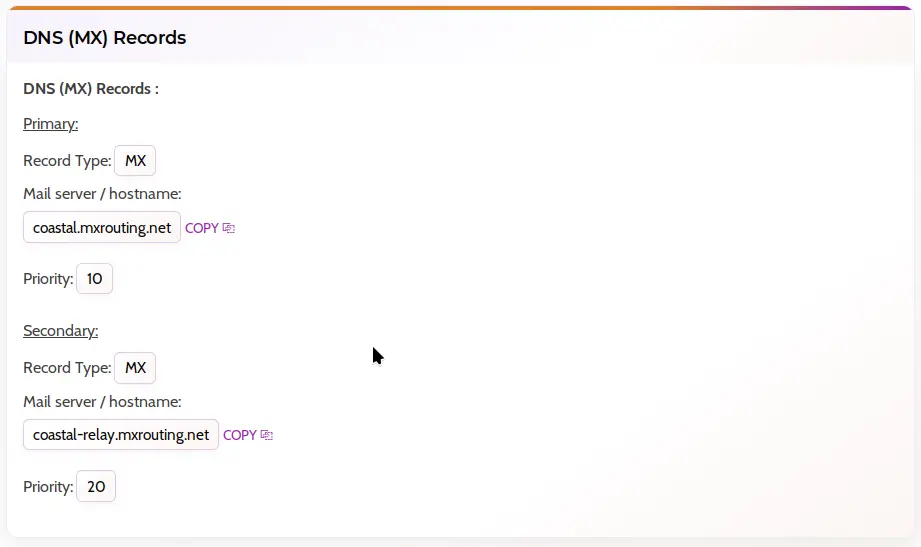
Primary Mail Server: The first MX record with priority 10 is your Primary Mailserver. Make a note of this hostname, as you will need it later.
Add both MX records to your domain’s DNS settings. Allow at least 20–30 minutes for the changes to begin propagating, although full propagation can take longer. Once the records are active, your new inbox should be able to receive email.
The hostname specified in the first MX record is also your Primary Mailserver.
Important: Add the two Hustly MX records at the root (@) of your domain, and remove MX records belonging to your previous email provider when switching to Hustly. Make these changes wherever your DNS is currently managed, whether with Hustly, your registrar or a provider such as Cloudflare.
For sending emails
Outgoing email authentication records help receiving providers verify your messages and reduce the risk of your emails being rejected or marked as spam. The three key records are SPF, DMARC and DKIM.
SPF Record
If your domain does not already have an SPF record, create a TXT record at the root (@) of your domain using the following value. The +a and +mx mechanisms also authorise the servers identified by your domain’s A and MX records to send email on its behalf.
Host: @
Record Type: TXT
Value: v=spf1 +a +mx include:mxroute.com ~all
If your domain already has an SPF record, do not create another one. Instead, edit the existing SPF TXT record and insert include:mxroute.com before its final all mechanism (such as ~all or -all). Keep existing mechanisms for other services you use. If you also want to authorise your site’s A record and MX hosts to send email, add +a and +mx if you trust those servers.
SPF check: Your domain should have only one SPF TXT record. Combine the mechanisms of all the services you use into that one record, and verify them against the settings in your Hustly account.
DMARC Record
Subdomain/Host: _dmarc
Record Type: TXT
Value: v=DMARC1; p=none; sp=none; adkim=r; aspf=r;
This default DMARC policy uses monitoring mode (p=none) and relaxed alignment for SPF and DKIM. It does not ask receiving providers to reject or quarantine messages that fail DMARC checks.
DKIM Record
Subdomain/Host: x._domainkey
Record Type: TXT
Value: Your DKIM public record
To find your DKIM public record, open the Email Admin section of your Hustly account and click “EMAIL DOMAIN SETTINGS” for the relevant domain.
Next, click “SEE DKIM RECORD” to display the DKIM record for your domain. You do not need to log in to the separate Email Admin Panel.
Copy the entire DKIM TXT value and its hostname (x._domainkey) into your domain’s DNS settings, without truncating the value.
If you use other services to send email, use a unique DKIM selector for each provider. The default used by the Hustly email service is x, which cannot be changed.
Mailserver settings
If you plan to access your email through Microsoft Outlook, Apple Mail on macOS or iOS, or another email application, you can configure mailserver addresses using your own domain. These records also let users access webmail and advanced email administration through URLs branded by your domain name.
Add the following three CNAME records to your domain’s DNS settings. Each record serves a different purpose.
For the destination of each record, use your Primary Mail Server. Your Primary Mailserver is the hostname you copied from the MX record with priority 10 in the earlier MX Records section. Copy the server hostname only, not the priority number.
mail.yourdomain.com: This is the standard mailserver address commonly used when configuring email clients. Having it under your own domain makes setting up applications such as Outlook and Apple Mail easier. Automatic discovery depends on the client’s supported methods, so some clients may still require manual configuration.
Host: mail
Record Type: CNAME
Value: Primary Mail Server
mailadmin.yourdomain.com: Provides a domain-specific URL for the Email Admin Panel, where you can access advanced email management options. See Part 5: Advanced Email Options for more details.
Host: mailadmin
Record Type: CNAME
Value: Primary Mail Server
webmail.yourdomain.com: Makes webmail available through your own domain. Users with email inboxes on your domain can visit this URL to access their mail through a web browser.
Host: webmail
Record Type: CNAME
Value: Primary Mail Server
After adding these records, allow up to 2 hours for SSL certificates to be issued automatically for the new hostnames. Use secure connection settings and make sure the certificate is valid before signing in. For email client setup instructions, see Part 4: Configure your email clients.
Troubleshooting
If your Hustly email service is not sending or receiving messages correctly, follow the checks below.
1. Double-check your email DNS records
First, verify that all the DNS records described in this guide have been added correctly for your domain: MX, SPF, DMARC and DKIM, along with the optional mailserver CNAME records if you configured them. Check the hostnames, record types and full values carefully, including the MX priorities. Your domain should not have conflicting MX records or multiple SPF records.
DNS changes can take time to propagate. Once the correct records are published, test sending and receiving email again.
2. Run Autoconfigure DNS
If you still have issues, open the Email Admin section of your Hustly account. Click “EMAIL DOMAIN SETTINGS” for the affected domain, then select “AUTOCONFIGURE DNS”.
This will copy the default Hustly email DNS records to the Hosting Admin Panel for your domain.
DNS managed by Hustly The updated records in your Hosting Admin Panel will be used for your domain. Email should generally start working within one hour after the records are updated. If it still does not work, open the DNS section of your Hosting Admin Panel and verify that the expected email DNS records are present and correct.
DNS managed elsewhere: Autoconfigure DNS adds the default records to your Hustly Hosting Admin Panel, but it does not update the DNS records hosted with your external provider. Open your Hosting Admin Panel’s DNS section and compare those records with the DNS records published at your DNS provider, using the settings described in this article as a reference. Add or correct any missing or mismatched records at the external DNS provider. See our DNS management guide for more information.
Contact Hustly Support
If your email service still does not work after checking the records and trying Autoconfigure DNS, please create a support request from your Hustly account.
Continue with the next guide
Previous: How to Enable Your Hustly Email Inbox Service
Next: How to Create and Manage Your Hustly Email Inboxes
Moving existing mailboxes? Read our email migration guide.
We hope you found this guide useful. If you need assistance setting up your Hustly email service, please create a support ticket in your Hustly account.