This article is a guide for customers on Hustly managed WordPress hosting plans, who are using our default setup. Users with WordPress setups similar to ours will find this guide useful as well.
As a website owner, managing your domain names and SSL certificates are critical. Luckily, if you are on a Hustly managed WordPress hosting plan,we have made this process easy for you.
PLEASE NOTE THAT CHANGING YOUR DOMAIN’S DNS SETTINGS WILL LEAD TO YOUR WEBSITE GOING OFFLINE TEMPORARILY. NAMESERVER CHANGES CAN TAKE UP TO 48 HOURS TO PROPAGATE.
If you are an existing Hustly customer and unable to do this yourself, please email support to have your domains setup by us at no extra cost.
In order to configure your domain and install SSL certificates, you need to be logged into your hosting admin panel, ideally from a modern web browser on a desktop or laptop sized device.
Before you read this article, we assume that you have read and completed setting up the following:
- Creating and setting up your Hustly hosting account.
- How to login to your hosting server’s admin panel
You can choose to configure your domain’s DNS settings in one of the three methods listed below. This article will explain method 1 in detail. The other two methods have their own guides, linked in-line in this article.
Method 1 – DNS Managed by your Domain Registrar :
Use nameservers provided by your domain registrar. This is the easiest and quickest way to get started.
This article you are reading, will explain method 1 in details.
Method 2 – DNS Managed by Cloudflare :
Using Cloudflare as your nameserver. This method has several security and performance advantages (read more).
Please see the detailed guide for using Cloudflare with Hustly here.
Method 3: DNS Managed by Hustly :
Use your Hustly hosting server as your nameserver.
Please see the detailed guide for using Hustly as your primary DNS here.
Method 1: DNS managed by Domain Registrar
In this method, you will need to add your Hustly server’s IP as your domain name’s A record. This is the easiest and quickest way to get started as it requires the least number of configuration changes.
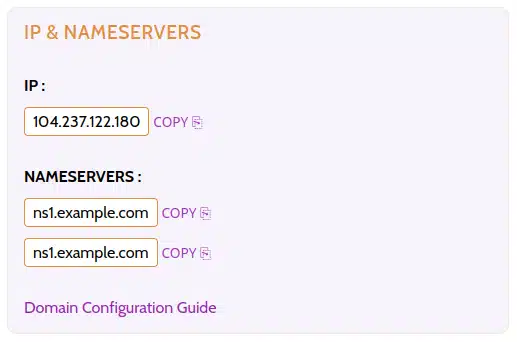
Step 1: Get your Hustly server’s IP address.
Login to the Hustly website management app. Once logged in, ensure that the “SELECTED WEBSITE” is the website you intend to configure.
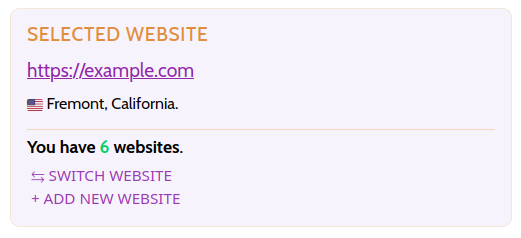
Scroll down to the IP & NAMESERVERS section. Your IP Address will be displayed. Copy this IP address and proceed to Step 2.
Step 2: Update DNS records at your Domain Registrar.
Login to your domain registrar account. Find and navigate to your domain’s DNS settings. Please ensure that your domain is using the nameservers provided by your registrar. Proceed to editing the DNS records.
You will need to add 2 records:
1. An A record pointing to your Hustly server’s IP Address:
Type: A
Name: @ (or leave it blank).
IPv4 address or Host: IP Address you copied in Step 1.
2. A CNAME record for the www subdomain:
Type: CNAME
Name: www
Target / Destination: yourdomainname.com
Once you have updated your DNS records, please wait at least 15-20 minutes before your proceed to Step 3. Once DNS records are updated, it can take anywhere from a few minutes to up to 48 hours in some cases, for DNS records to propagate.
You can use a third party tool such as whatsmydns to monitor how your DNS changes are propagating across the internet in real time.
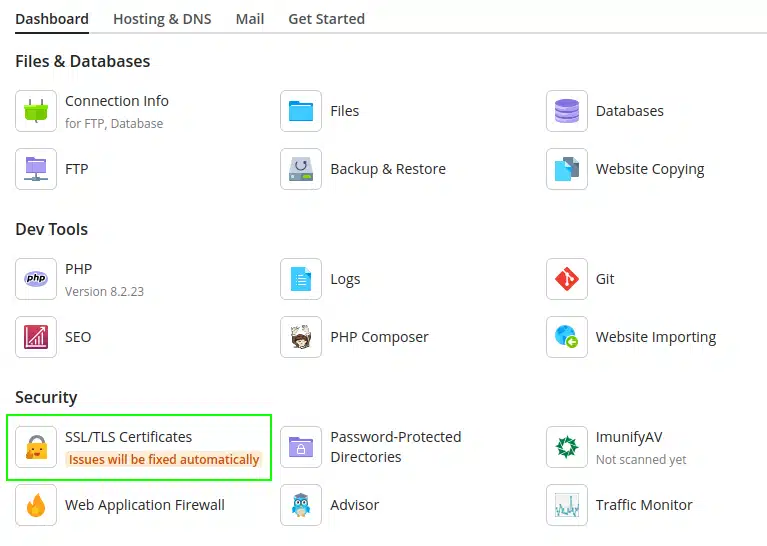
Step 3: Install an SSL certificate on your Hustly server.
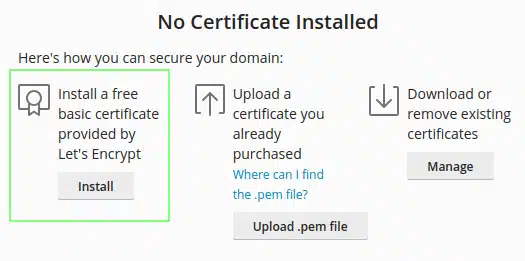
Login to your hosting admin panel (Plesk). Find and navigate to the SSL/TLS Certificates section, in the Dashboard tab for your domain.
This section will show you the available options to install an SSL certificate. Choose the first Let’s Encrypt option.
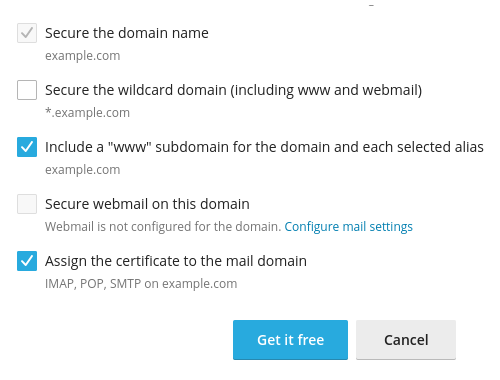
In the installation options, please disable the “Secure the wildcard domain” option. If you want the “wildcard” option enabled, you will need to add an additional acme-challenge record to your Cloudflare DNS settings. The panel will prompt you with the records to add, during the installation process. In most cases, it is okay to keep this option disabled. The settings shown in the image below, should work for most cases.
Proceed to install the SSL Certificate and let the installation finish.
That’s it!
The entire process should be error free, if you have followed all the steps.
Please note that sometimes errors can happen during the installation process, so please wait for some time and try again, as delays in DNS propagation can sometimes cause unknown errors.
If you wish to use one of the other methods to set up your Domain’s DNS to work with your Hustly hosting server, please see the relevant tutorials in the links below:
Method 2 – DNS Managed by Cloudflare :
Using Cloudflare as your nameserver. This method has several security and performance advantages (read more).
Please see the detailed guide for using Cloudflare with Hustly here.
Method 3: DNS Managed by Hustly :
Use your Hustly hosting server as your nameserver.
Please see the detailed guide for using Hustly as your primary DNS here.
We hope you found this guide useful. If you have any questions, comments or feedback, please feel free to share your thoughts in the comments section below.