This article is a guide for customers on Hustly managed WordPress hosting plans, who are using our default setup. Users with WordPress setups similar to ours will find this guide useful as well.
The ability to create and sync a staging site is inbuilt in the Hustly setup, with the included Plesk hosting panel. The steps to setup and manage a staging site are as follows:
Step 1: Setting up a staging domain
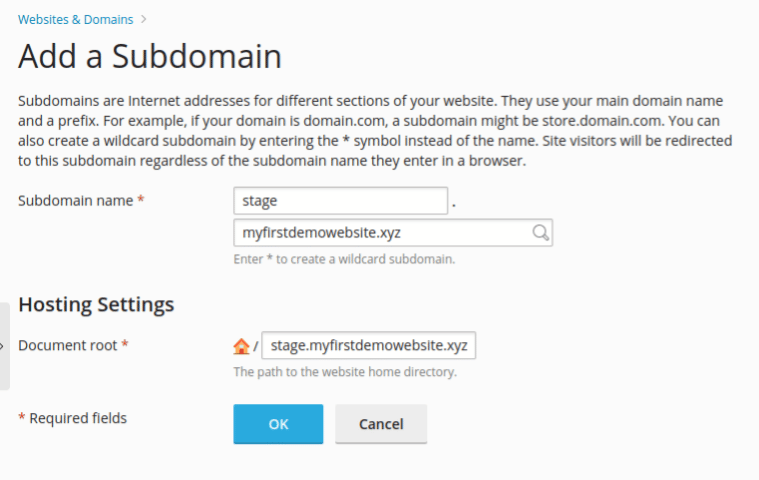
Login to your Plesk hosting panel and select your domain for which you want a staging instance. Select the “Add subdomain” option as shown in the screenshot below.

Staging is usually setup on a subdomain. So if your domain is myfirstdemowebsite.xyz, you want your staging to be setup on a subdomain such as stage.myfirstdemowebsite.xyz. Enter the word ‘stage’ to identify the subdomain. Other suitable words are usually “dev” or “staging”.
Once you have added your subdomain, you will see the section below appear on your Plesk panel.
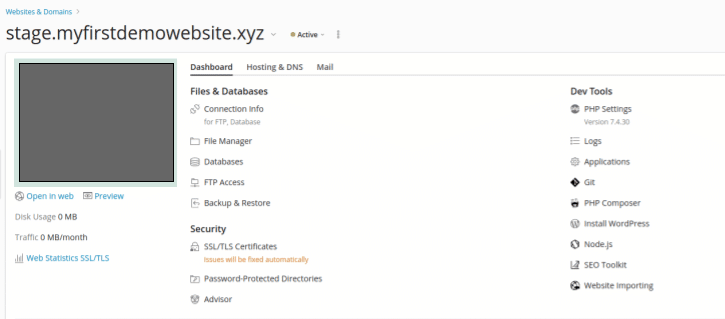
If your domain Name Servers are managed in Hustly, you should not need to configure your subdomain any further, beyond installing additional SSL certificates on your subdomain. To learn to configure domains and subdomains with Hustly, please refer to our detailed domain and nameserver management guide. If your domain Name Servers are managed externally (not by Hustly), you will want to add an additional “A” record for the “stage” subdomain, pointing to your Hustly server IP address.
Step 2: Creating the staging website
Depending on your workflow, there are a few options here. You want to choose the option that suits your workflow, depending on whether you want to develop on the staging site first, or migrate en existing website into your staging website.
Migrating an existing WordPress website outside your Hustly account to your staging subdomain

Migrating an existing WordPress website to your newly created staging subdomain, is the same as any other WordPress migration. You can either achieve this via popular WordPress migration plugins, using the “website importing” feature on your Plesk panel (highlighted in green in the image above), or by manually exporting/importing your website. Please contact our support to discuss the best migration option for your existing website. A free migration is included in all Hustly WordPress hosting plans.
Launching a new WordPress website on your staging subdomain
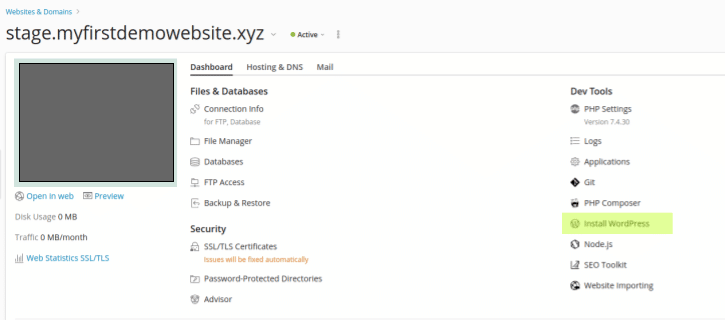
If you want to start a fresh project, and develop this on the staging domain, this is the option that is best for you. You can simply install a WordPress instance on your subdomain from your Plesk panel as shown below (look for the “Install WordPress” option highlighted in green).
Cloning an existing WordPress website hosted on your Hustly account into your staging subdomain
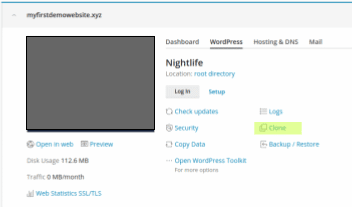
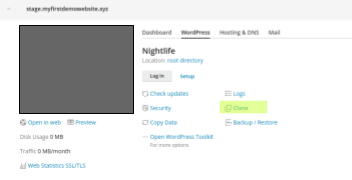
If you wish to migrate an existing website hosted on your Hustly account to this subdomain, you will want to use the inbuilt ‘clone’ functionality as shown below, to create and copy an exact replica of your production website into your staging subdomain. To find the ‘clone’ option , navigate to your domain with the source WordPress instance, go to the “WordPress” tab and find the “clone” option (Highlighted in green below).
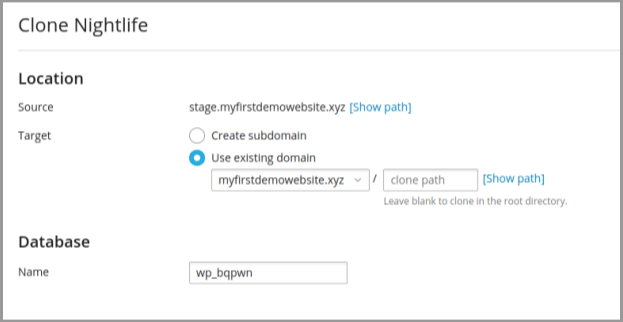
In the subsequent dialog, select the “Use existing domain” option. Select your target staging subdomain, start the cloning process and wait for it to finish. Please ensure that you leave the “clone path” field empty, to prevent WordPress from installing into a subdirectory.
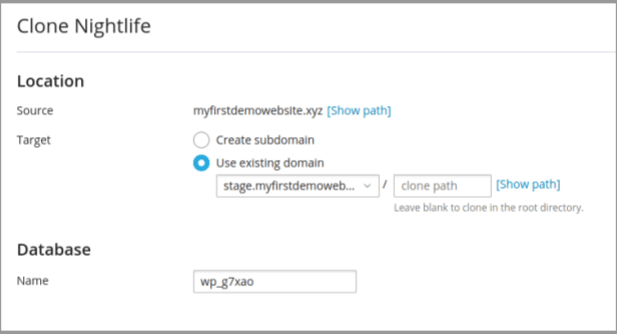
Once the cloning process finishes, you would have cloned your production website into your staging subdomain.
You should now have a WordPress instance installed on your staging subdomain. You can now go ahead and make changes to your staging website. Once you have completed building the staging website, you will want to copy the changes on your staging website to your production website.
Step 3: Cloning staging website to production
If you used your staging website to build the first instance of your website, you will want the create a complete “Clone” of your staging website to your production domain name. This “Clone” process is carried out from the Plesk panel, and creates an exact replica of the WordPress website on your staging domain, and copies it to a
WARNING: Please note that this cloning process will wipe out anything hosted on your production website. In case you want to preserve what you have on your production domain, please skip ahead to Step 4. If you had chosen the “Cloning an existing WordPress website hosted on your Hustly account into your staging subdomain” option in Step 2, you will want to skip this step as well and jump to Step 4 as well. If you want clarification and don’t understand this process, please contact our support.
Navigate to your subdomain with the source staging WordPress instance, go to the “WordPress” tab and find the “Clone” option (Highlighted in green below).
In the subsequent dialog, select the “Use existing domain” option. Select your target production domain, start the cloning process and wait for it to finish. Please ensure that you leave the “clone path” field empty, to prevent WordPress from installing into a subdirectory.
Once the cloning process finishes, you would have cloned your production website into your staging subdomain.
Step 4: Syncing production and staging websites
If you have reached here, you should now have a production WordPress website on your domain, and a staging instance on a subdomain. The most common task maintaining these two WordPress instances is the “Copy Data” functionality using which you can sync incremental changes you make to your staging website, to your production website.
The key distinction between the “”Copy Data” and the previous “Clone” features is that the copy feature is used to copy “incremental” changes. These include changes you make to your Website’s content (the code, the layout or new posts). You do not want to copy your entire database over from your staging website to production, since this will wipe out your production website’s database.
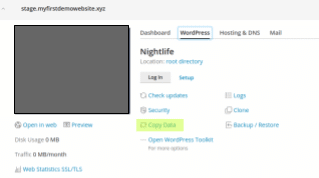
To initiate the copy process, find the ‘Copy Data’ option on your source staging website. Refer to the image below with the copy option highlighted in green. Select the “Copy Data” option.
In the following dialog, you get the options to choose the level of sync or copy you want. Select your target production domain. A common setting to sync incremental changes, is to select the “Files and Database” option, replacing files modified on target. Among the database table, you want to sync all except the pages, posts and users tables. You can configure these options to the settings that suite your Workflow the most.
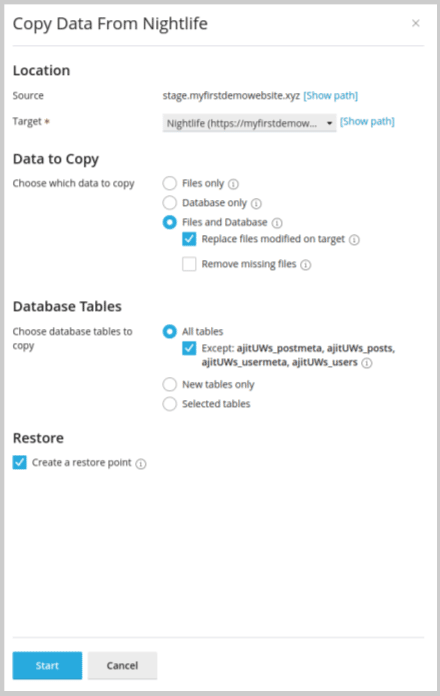
Start the copy process and wait for it to finish. You should not have yur stage and production websites in sync.
Congratulations! You now have WordPress setup with staging.
You should not be familiar with creating a staging subdomain, cloning your staging site to production and vice versa, and copy incremental changes from your staging site to production. As you would have noticed, there are multiple options and workflows to maintain a staging setup for your WordPress website. How you want to manage your staging environment, really depends on your circumstances. For instance, if you only infrequently update your staging website and frequently update the production website, you will want to clone your production site to your staging website before you start updating the staging website.
Having a staging setup is a huge advantage for website owners with active customers. We hope you found this guide useful, and that it helps you maintain a great and seamless staging setup. Please let us know your feedback or questions in the comments section below.