You are reading Part 5 of our Hustly Domain, DNS & SSL guide series. Choose another guide below at any time.
| Guide | Topic |
|---|---|
| Part 1 | How to manage your domain names & SSL certificates. |
| Part 2 | How to use Hustly as your domain's primary nameserver. |
| Part 3 | How to configure Cloudflare DNS with Hustly WordPress hosting |
| Part 4 | How to manage your DNS records with Hustly. |
| Part 5 | How to configure Your Domain Registrar with Hustly Hosting. (current guide) |
This guide is for customers on Hustly managed WordPress hosting plans who have registered their domain with a third-party domain registrar and want to connect it to Hustly.
Many customers register their domain name with one company and use Hustly for hosting. This guide explains two ways to connect a registrar-managed domain to Hustly, along with basic DNS and SSL steps.
Important DNS notice: Changing DNS records or nameservers can temporarily interrupt your website, email and other services if the new configuration is incomplete. Nameserver changes can take up to 48 hours to propagate.
If you are a Hustly customer and need assistance making these changes, please create a support ticket to have your domains set up by us at no extra cost.
Before you start
Make sure the domain is already added to your Hustly hosting account. If not, add it from your Hustly account or Hosting Admin Panel.
In this guide, the same basic steps apply to popular registrars such as:
- GoDaddy
- Namecheap
- Squarespace Domains
- IONOS
- Hostinger
- Porkbun
- Dynadot
- Name.com
- Hover
- Network Solutions
The menu wording can vary between registrars and may change over time. Look for DNS Settings, Manage DNS or Nameservers in your registrar’s domain management area.
Choose how to connect your domain
Option A — Keep DNS at your registrar: Update the website A and CNAME records. This keeps your existing nameservers and is suitable if you already use email or other DNS-based services.
Option B — Use Hustly as primary DNS: Change the domain’s nameservers to Hustly. This provides more automatic setup but requires copying all existing custom DNS records first. See the Hustly nameserver guide.
Option A: Point a registrar-managed domain to Hustly
Step 1: Retrieve your domain’s IP address from Hustly
Log in to your Hustly website management app. Find the IP & NAMESERVERS section for the selected domain.
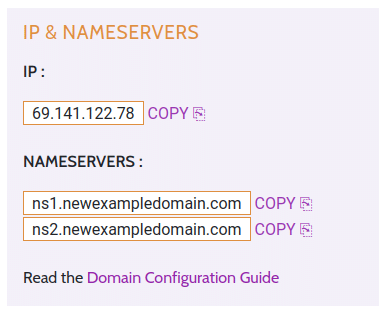
Copy your Hustly server’s IP address.
Step 2: Open the DNS settings at your registrar
Sign in to your registrar’s domain manager, select the domain and open its DNS settings. For GoDaddy, the relevant section has historically been labelled Manage DNS. Other registrars use similar DNS-records menus.
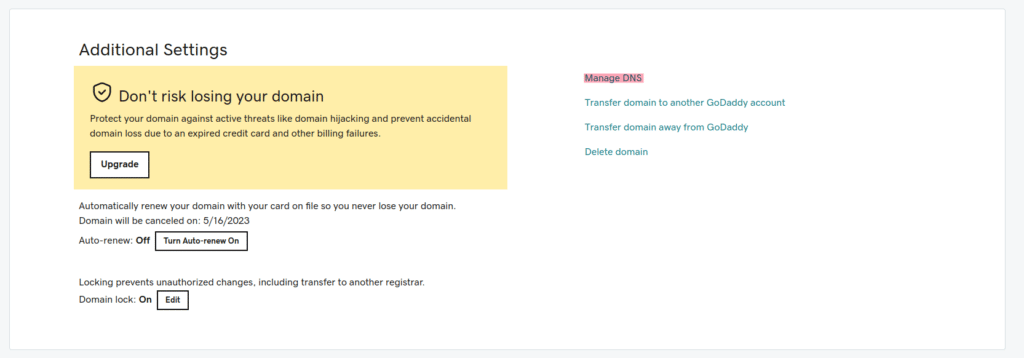
If your domain uses external nameservers (for example Cloudflare), make changes at the provider currently hosting DNS rather than the registrar’s inactive DNS zone.
Step 3: Add or update two records
1. An A record pointing to your Hustly server’s IP address
Type: A
Name: @ (or leave blank if your DNS provider requires it).
IPv4 address / Value: The Hustly server IP you copied.
2. A CNAME record for the www subdomain
Type: CNAME
Name: www
Target / Destination: yourdomainname.com (replace with your actual domain).
Avoid leaving old conflicting A or AAAA records for the website hostnames. Keep existing mail, TXT and service records unless you intend to change those services.
Wait at least 15–20 minutes before proceeding with SSL installation. DNS changes may take anywhere from a few minutes to 48 hours to propagate.
You can check propagation with whatsmydns.
Step 3: Install an SSL certificate on your Hustly server
Log in to your Hosting Admin Panel. For your domain, open the SSL/TLS Certificates option in its Dashboard.
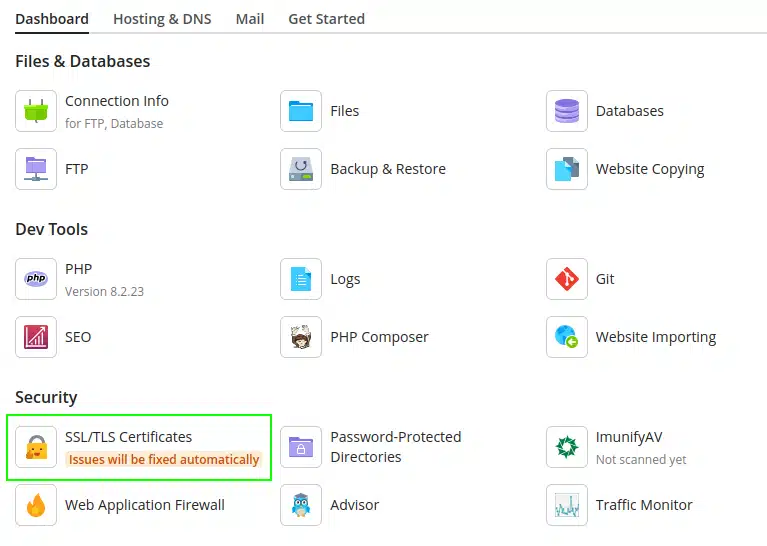
This section displays the available SSL certificate options. Select the free Let’s Encrypt option.
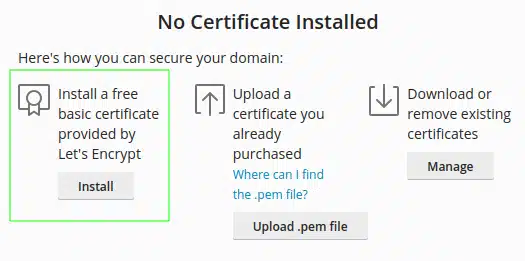
In the installation options, please disable “Secure the wildcard domain” unless you specifically need a wildcard certificate. Enabling the wildcard option may require you to add a _acme-challenge DNS record at your DNS provider, as prompted during installation.
For most websites, leaving the wildcard option disabled is fine. The settings shown below should work in most cases.
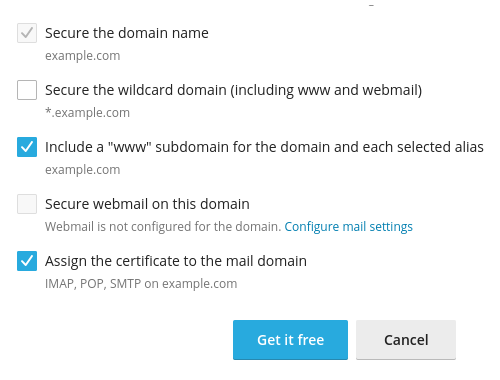
Proceed to install the SSL certificate and let the installation finish.
That’s it!
Your domain should now be configured. If certificate issuance fails, allow more time for DNS propagation, check the A record and try again.
Option B: Use Hustly nameservers instead
To use Hustly as your primary DNS provider, open the Nameservers section at your registrar and choose custom nameservers. Enter the exact ns1 and ns2 hostnames from your Hustly account.
Before making the change, copy any existing MX, SPF, DKIM, DMARC, verification, subdomain or other service records into Hustly. Read the detailed nameserver guide and the DNS record editing guide.
After your domain is connected
Your website should become available on Hustly once the DNS records propagate and the SSL certificate is installed. If you notice issues, verify the nameservers, A/CNAME records, web-server IP and certificate status before retrying.
For Cloudflare DNS, follow the Cloudflare guide. For email records, see the email DNS configuration guide.
Continue with the next guide
Previous: How to Manage Your DNS Records with Hustly
Next: How to Configure DNS Records for Your Hustly Email Inbox Service
If you use Hustly for email, see the Hustly email DNS configuration guide.
We hope you found this guide useful. If you need help configuring your domain, DNS or SSL, please create a support ticket in your Hustly account.